|
Step 1: Dry pan/ tray flashings are frequently used to ensure that “Capillary
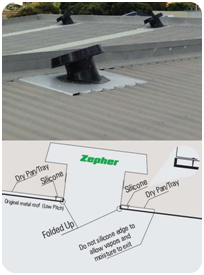
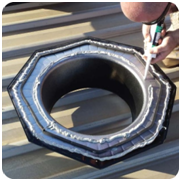
Leaks” do not occur – a reliable method of water tightness. The dry pan is fitted under the parapet flashing which is the high point, and goes over the penetration of the Zepher. The Zepher is fitted onto a “no pitch” pressed or folded metal flashing using a sealant joint and mechanically fixed at 8 points around the flashing.
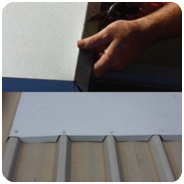
Locate and identify location to install the Zepher unit. For optimum effects, Zepher is to be installed at the highest point of the roof and facing slightly South if you are in the Northern hemisphere. Avoid areas where there will be a shadows falling upon the Zepher at any time of the day. Ensure that you have sufficient and appropriate dry pans (not supplied – own) for the installation. (Picture 1)
|
|
|
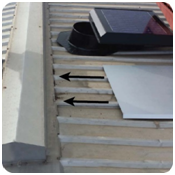
Step 2: Prepare the metal ridges by removing the screws on the installation areas first, and then prying them up to gain access for slotting in a dry pan under the metal ridge. The dry pan where the Zepher will be installed will have to be closed ended on the lowest side at the roof ventilator. (Picture 2)
|
|
|
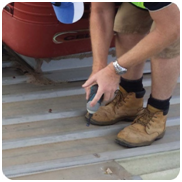
Step 3: The screws securing the metal roofing sheets are normally screwed on the higher points of the roofing sheet profiles. These screws bolts on to the roof battens beneath them. Remove all screws where the dry pan will be covering. You will need to secure the dry pan over the same locations later on. (Picture 3)
|
|
|
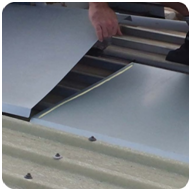
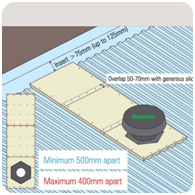
Step 4: If the Zepher is to be installed on a strategic placement lower down the roof, additional connecting dry pans (open ended on both sides) may be used. Insert the additional flashing with an overlap of 50-70mm, additionally sealed with a bead of silicone adhesive in between prior to overlapping. Maximum lengths of dry pans should not exceed 3.5m each for safe handling. Dry pans of 2m each is recommended for easy handling. Maximum length of dry pans combined should not exceed 9.8m in length. (Picture 4)
|
|
|
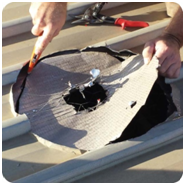
Step 5: Mark and cut out the shape of the roofing sheet profiles on the closed end of the last dry pan that the Zepher will be installed over so that the dry pan will fit over the roofing sheet with minimal gaps. To prevent premature corrosion of the metal roof, do not seal the dry pan / tray flashing fronts connecting to the metal roof to allow moisture to evaporate and exit.(Picture 5)
Note: Right and left hand tin snips may be required depending on the roofing sheet profile.
|
|
|
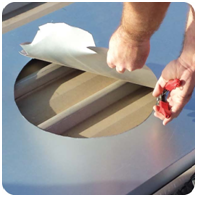
Step 6: Ensure that the intended hole opening area does not have any roof battens or rafters on its underside. Mark the hole with the Zepher neck on the metal roof and cut the hole. (Picture 6)
Note: Trim / cut off any ceiling of roof panels, sarkers or insulation that may obstruct air flow.
|
|
|
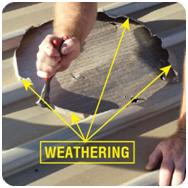
Step 7: Ensure that after cutting the hole on the roof, bent the edges of the hole upwards with a plier or alternative tool to form a "WEATHERING" water barricade as a secondary precaution against leakages.(Picture 7)
|
|
|
Step 8: Measure and locate Zepher neck’s hole position on the dry pan. Cut the hole with tin snips. (Picture 8)
|
|
|
Step 9: Secure the dry pans by bolting it on to the roof battens through the roofing sheets where the previous holes were. The dry pan will have to be further stitched (by bolts) to the other areas of the roofing sheets in order to close up all the gaps on the dry pan joints as well as its joints to the roof. Ensure that stitching is done down at the bottom and sides of each tray, approximately 400mm apart. Other areas can be a minimum of 500mm apart. (Picture 9)
|
|
|
Step 10: Adhere the supplied sponge tape around the middle of the Zepher metal roof flashing underside. Apply 2 beads of silicone before and after the sponge tape. (Picture 10)
|
|
|
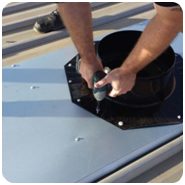
Step 11: Bolt the Zepher Metal Roof Flashing over the hole on the dry pan with the supplied bolts thought the pre-drilled holes on the Flashing. (Picture 11)
|
|
|
Step 12: To secure the Zepher, drill three 3mm holes through the neck of the Zepher and the flashing. Then rivet or screw the neck of the Zepher to the neck of the flashing. The Zepher can now operate without any maintenance. (Picture 12)
|
|
|
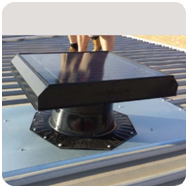
Step 13: To finalize the installation, pick up and remove all debris from the installation thoroughly and wash the roof by hosing down any dust or fine debris from cutting of holes. Ensure solar module is cleaned and no stickers or fingerprints on it.
|
|
THE METAL ROOF FLASHING SET INCLUSIVE OF:
- 1pc Neck Flashing for Metal Roof.
- 1pc Neoprene Sponge Tape
- 11pcs of Self tapping Screws
|